Auto Flight Failure Cases
Both FMGCs exchange data through a cross-talk bus and are synchronized.
When both FMGCs cross-talk, they are in DUAL mode of operation.
The FMGC which drives the synchronization is called MASTER.
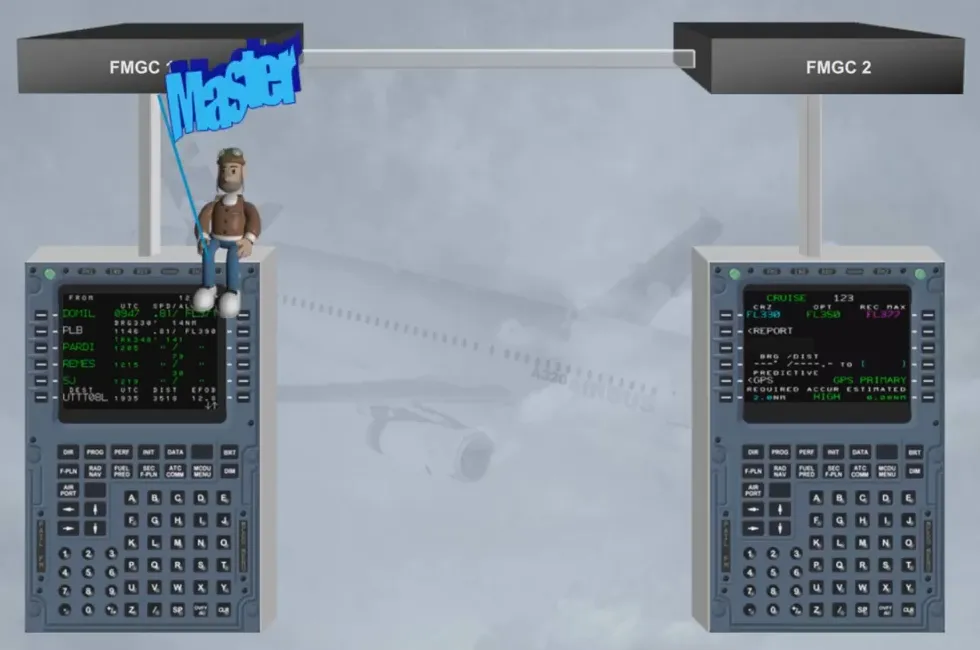
The master FMGC is automatically determined by the engagement status of the AP/FD:
- If AP 1 is ON, FMGC 1 is master
- If AP 2 is ON, FMGC 2 is master
- If AP 1 + 2 and/or FD 1 + 2 are ON, FMGC 1 is master.
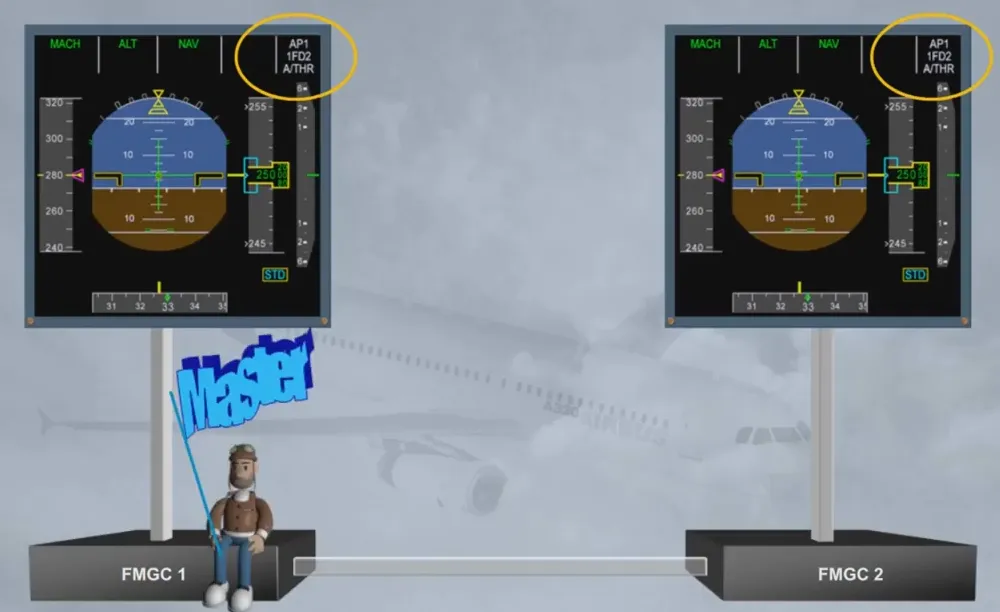
Here, FMGC 1 is the master as AP 1 is on.
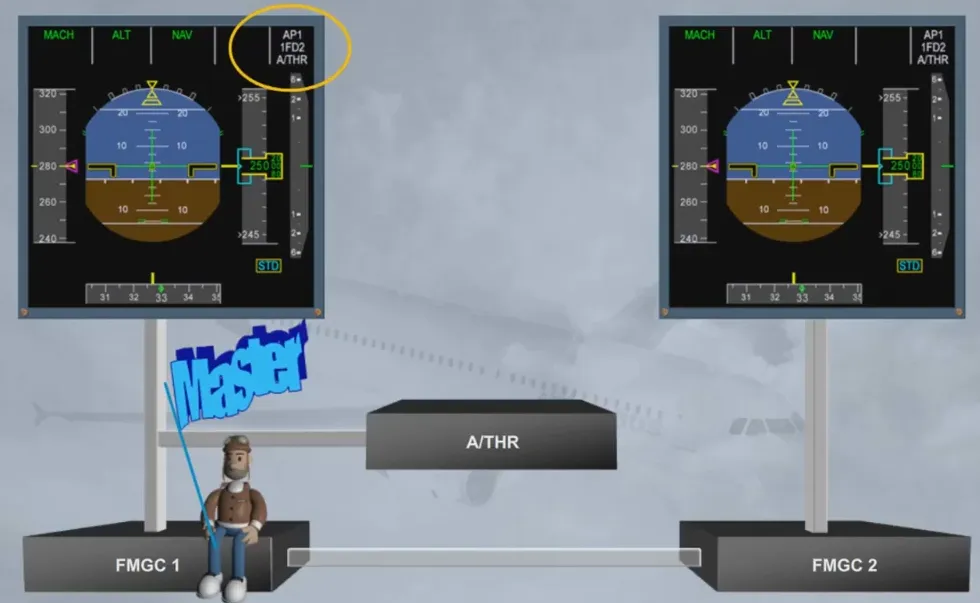
The A/THR is driven by the master FMGC.
Note: when FD 1 +2 are ON, each FMGC drives its FD and FMA on its onside PFD.
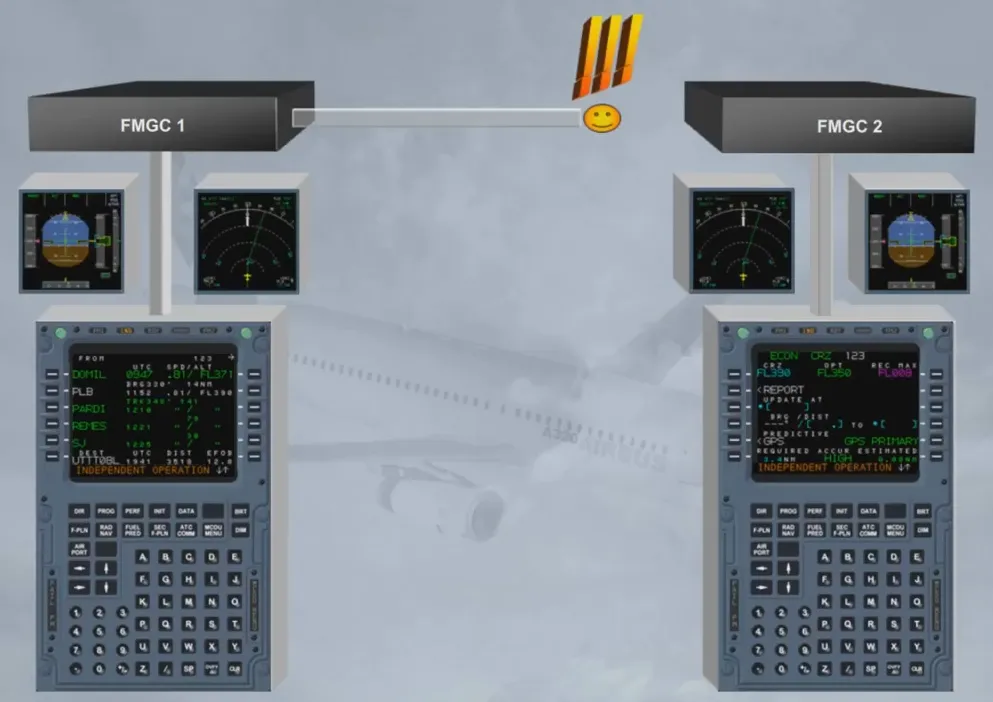
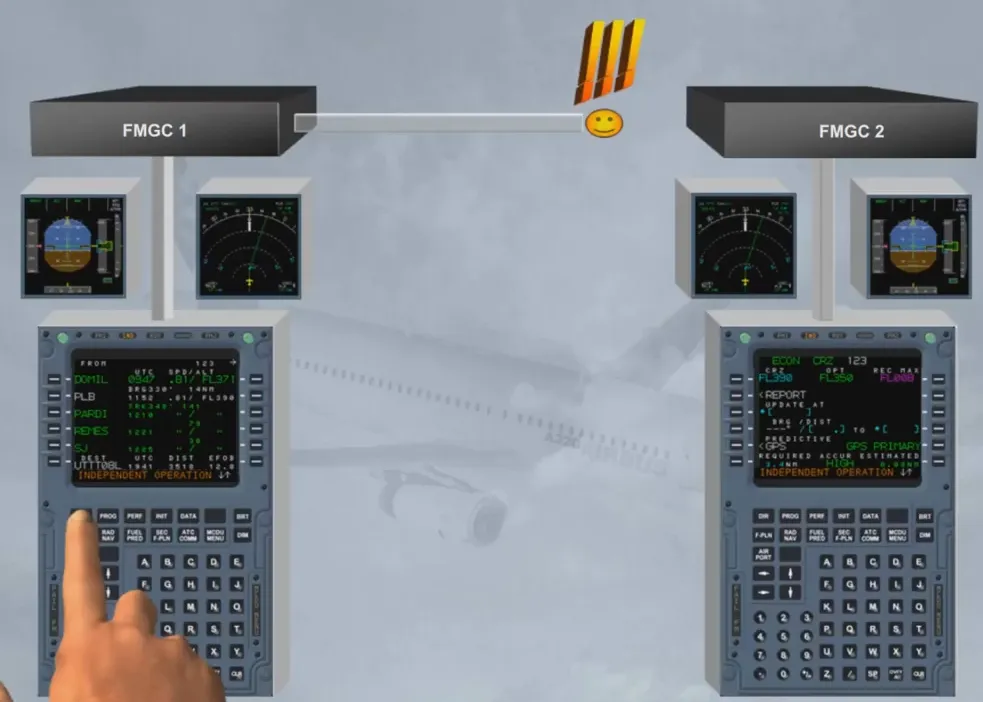
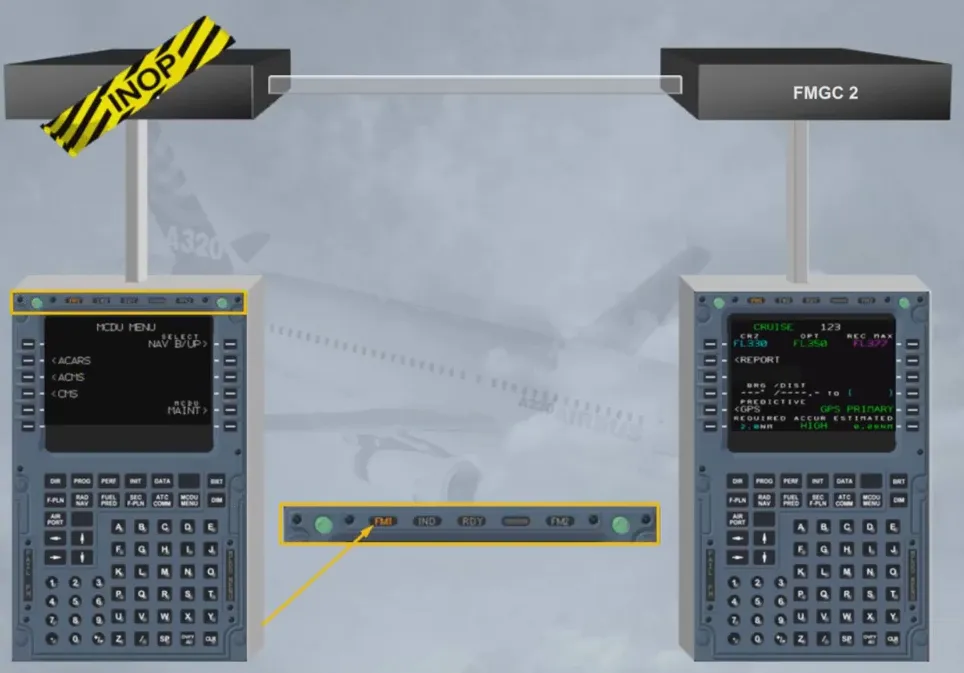
If the cross-talk is lost between both FMGCs, each FMGC operates independently.
This mode of operation is called INDEPENDENT mode. The crew is advised by a message on the scratchpad “INDEPENDENT OPERATION”.
Notice the “IND” amber light on each MCDU which indicates that the onside FM has detected an independent mode of operation.
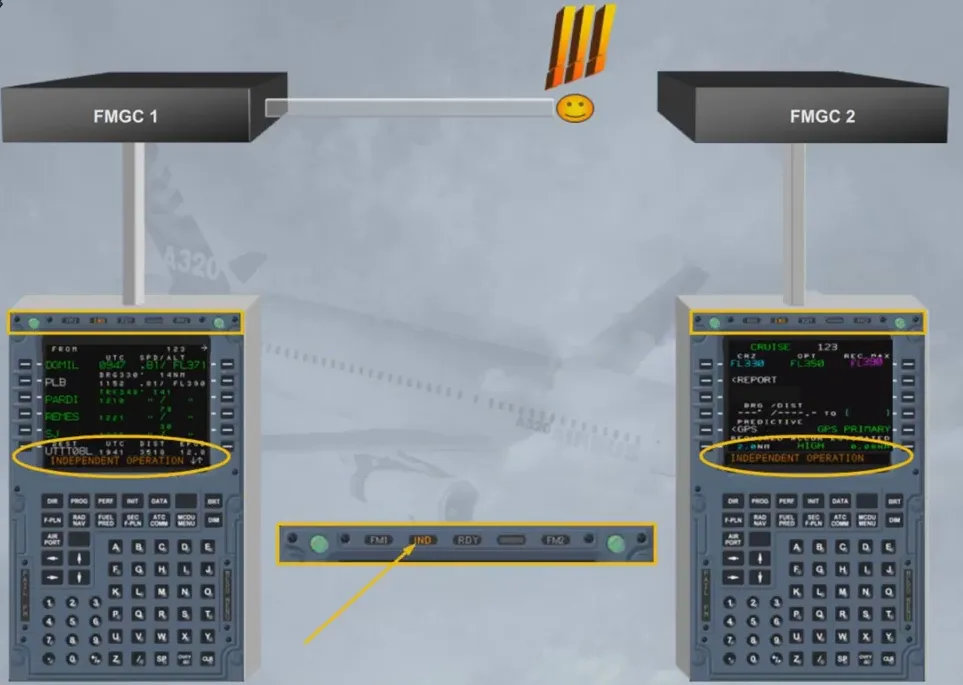
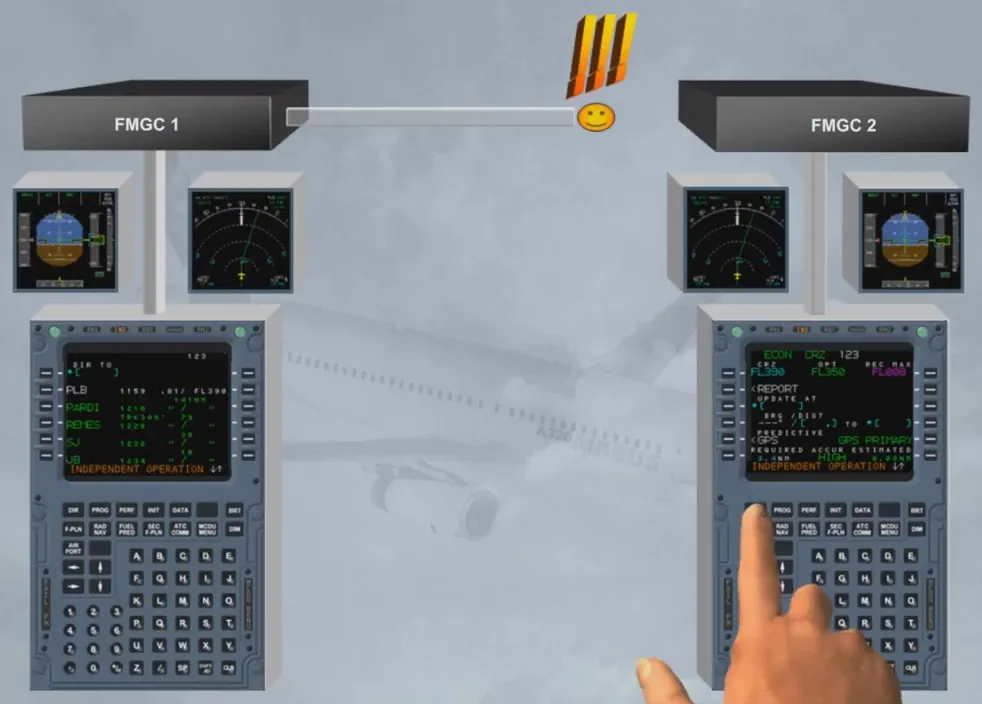
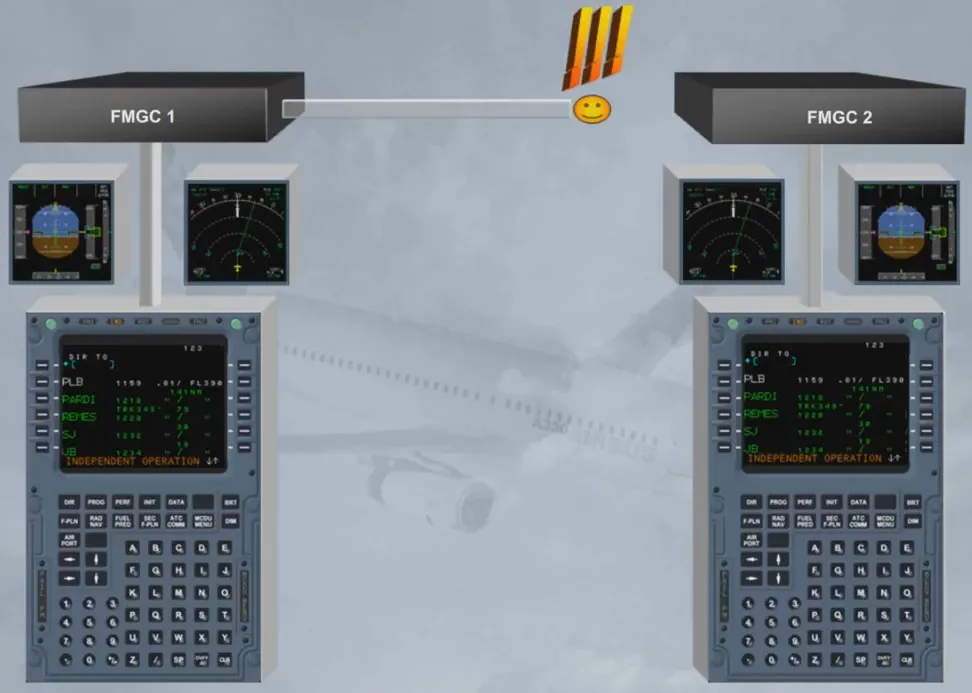
In Independent mode, each FMGC drives its own FG (AP/FD), its own EFIS (PFD/ND), and its own MCDU.
The crew must make the same entries on each MCDU in order to have the same guidance orders for both AP/FDs and the same information displayed on EFIS and on MCDU.
When the cross-talk is recovered, the FMGCs revert automatically to Dual Mode.
Let us review the failure of one FMGC, FMGC 1 for example. Let’s assume we are in flight and no previous faults have occurred.
If AP 1 and A/THR were engaged, AUTO FLT AP OFF and A/THR OFF are triggered on ECAM. AP 1 and A/THR go off.
Note: you can re-engage the AP on the healthy side, in our case AP 2.
If A/THR has disengaged, it can be re-engaged at the same time.
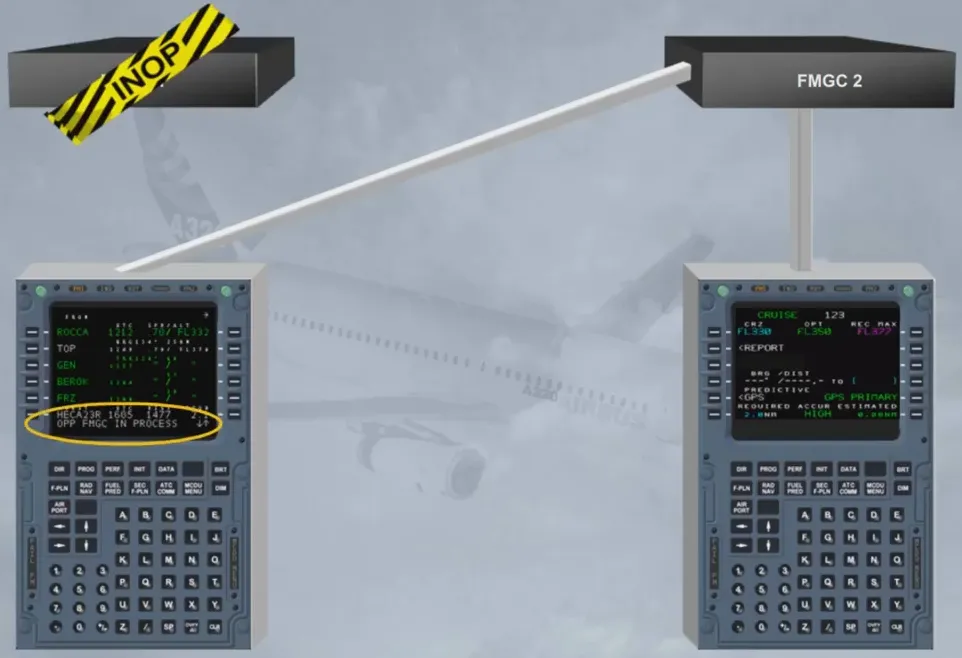
Notice the amber FM 1 light on the MCDU indicates that the onside FM has failed.
MCDU 1 is now a copy of the other MCDU with the scratchpad message:
- OPP FMGC IN PROCESS.
This mode of operation is called “SINGLE mode”.
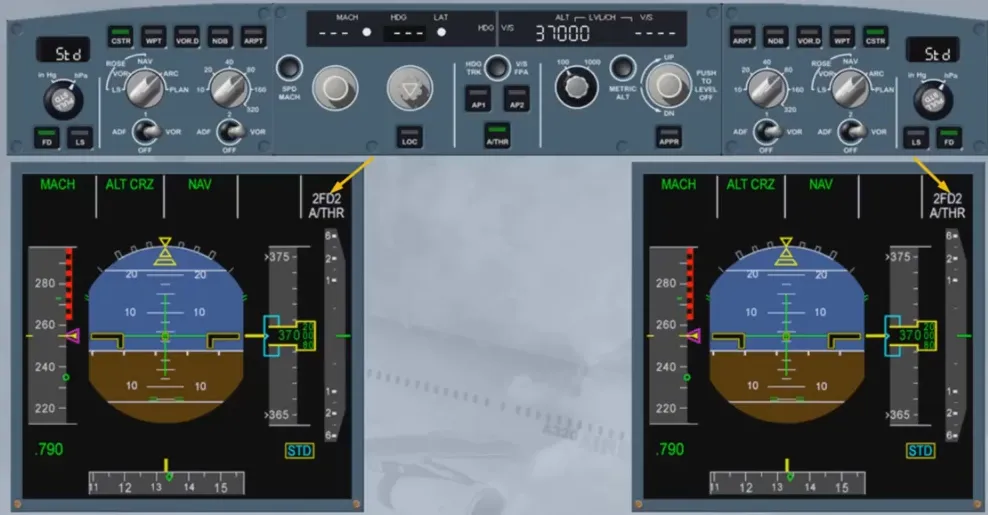
Both FMAs display 2FD2, indicating that FD bars on both PFDs are driven by FMGC 2. Additionally, only FMGC 2 position is computed and FMGC 2 tunes the offside navaids.
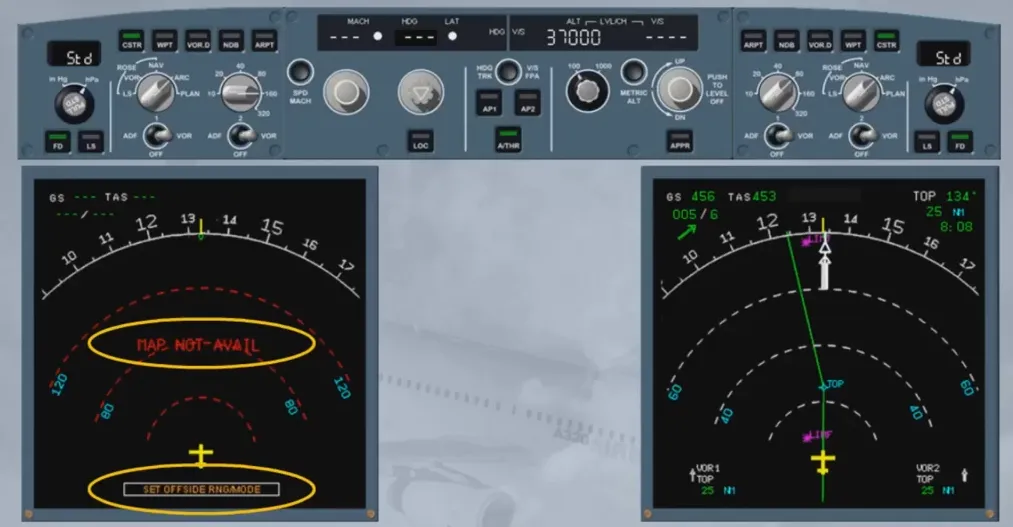
As a consequence of “SINGLE Mode”, ND 1 displays “SET OFFSIDE RNG/MODE” and “MAP NOT AVAIL” messages as long as ND 1 range and mode are not set identically to those of ND 2.
Here, the Captain’s ND has to be set to the same range as the First Officer’s ND in order to be able to display navigation map.
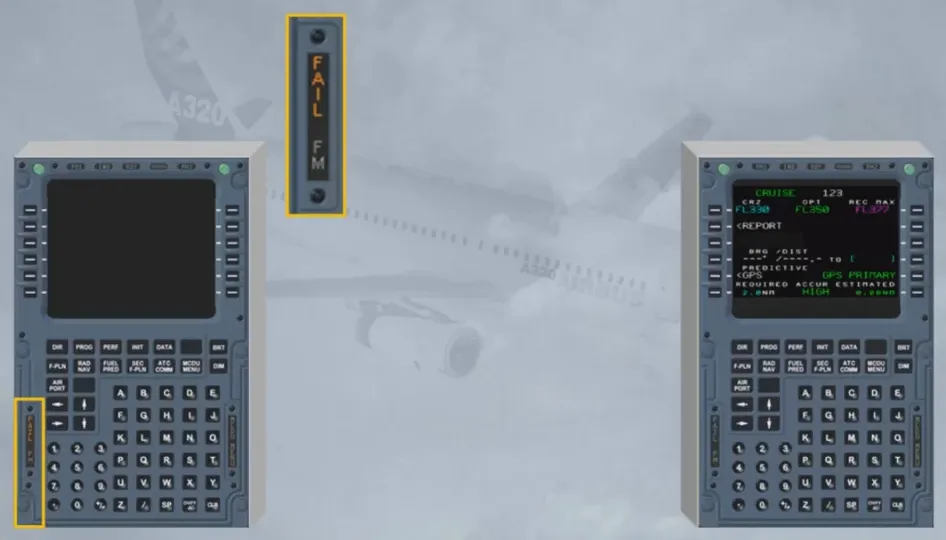
If you cannot insert any data into the scratchpad nor change any MCDU page, the MCDU is “locked”.
Such a failure is not automatically detected. To recover the faulty MCDU, simply pull the related CB then, after 10 s, push it back.
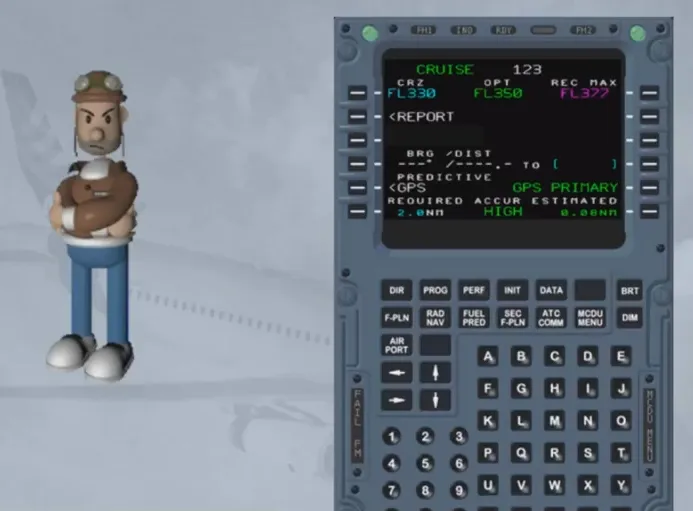
The same procedure would apply in case of a MCDU failure indicated by the amber annunciator “FAIL” on the MCDU itself.
You can try to recover the faulty MCDU, by simply pulling the related CB then, after 10 s, by pushing it back.
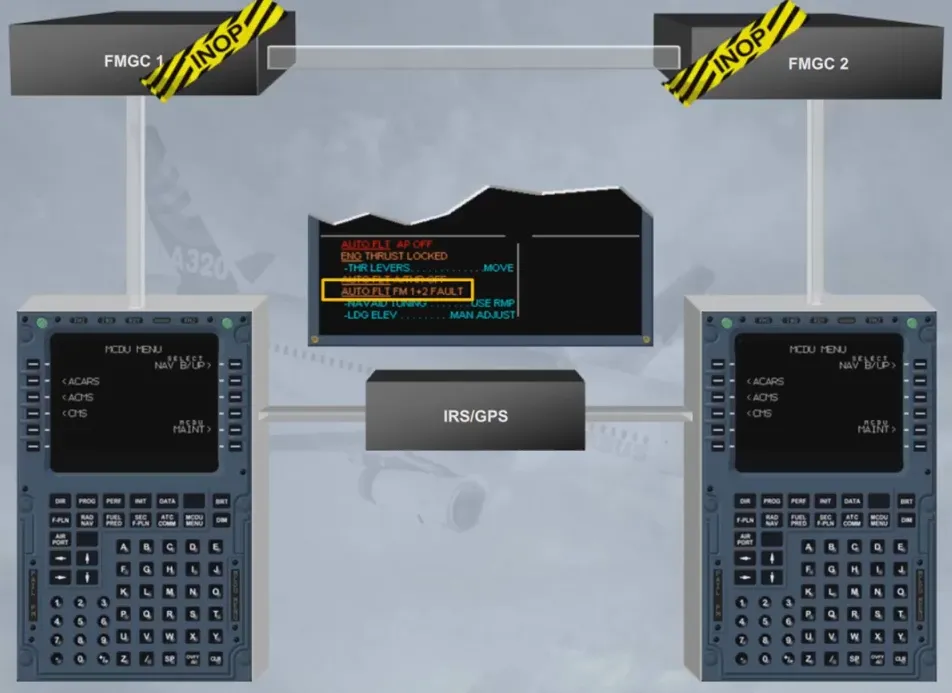
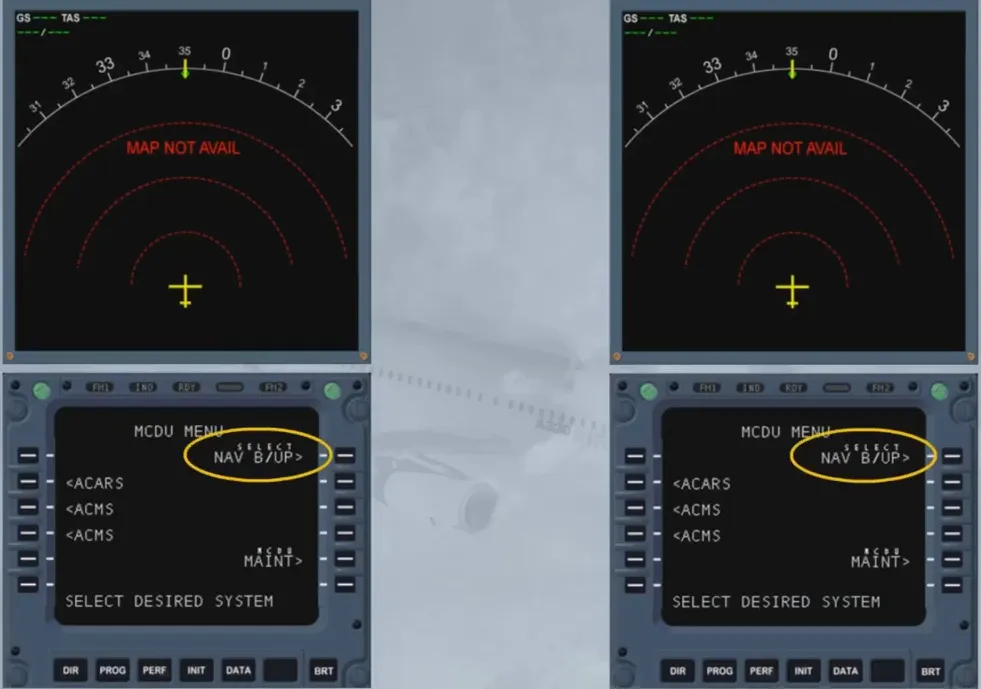
In case of failure of both FMGCs, a navigation mode is still available to the crew using the MCDUs and the IRS/GPS. It is called the Navigation Back-Up (NAV B/UP). This NAV B/UP, is possible thanks to the continuous down-loading of the F-PLN from the FMGCs to their related MCDUs.
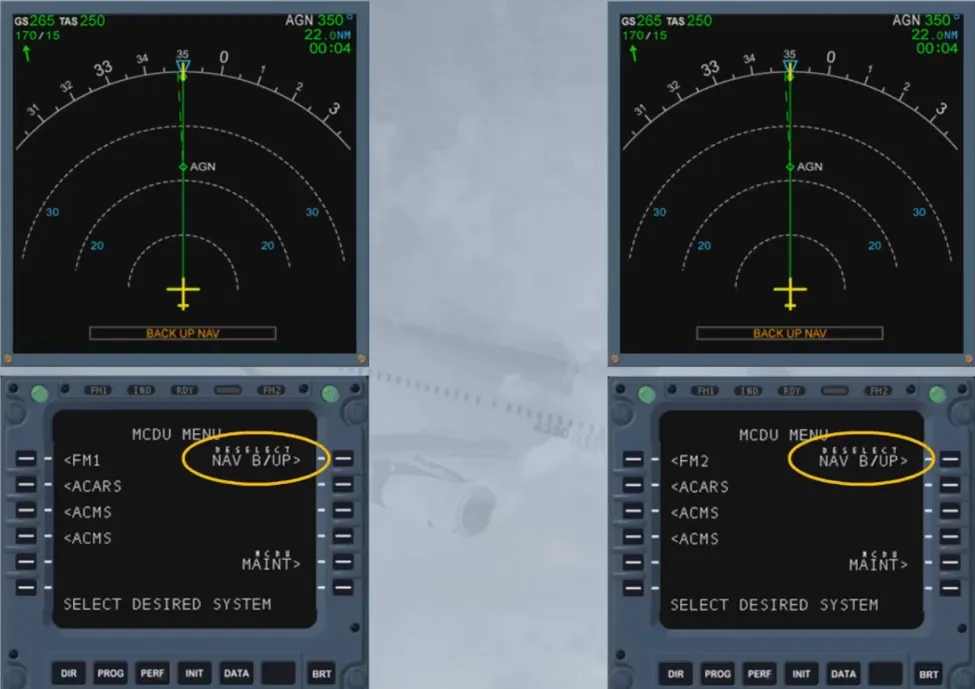
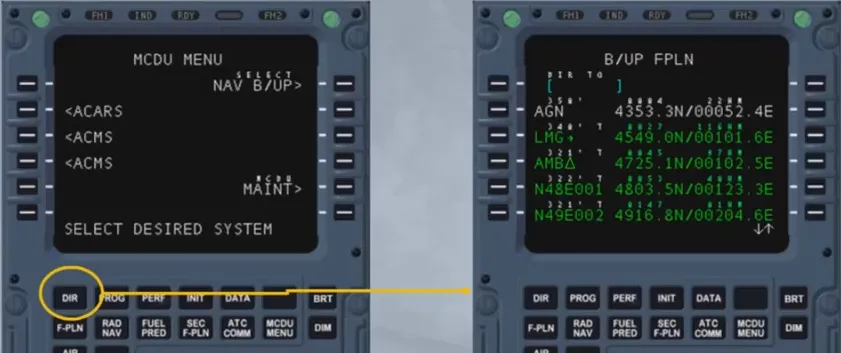
The selection of the NAV B/UP prompt on the MCDU MENU pages activates the mode.
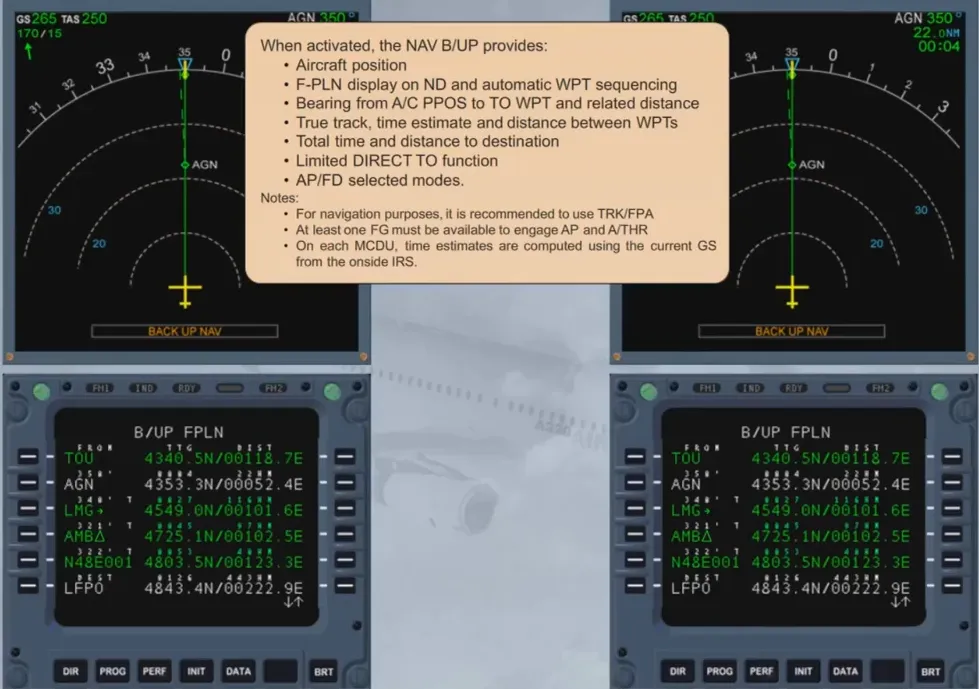
When activated, the NAV B/UP provides:
- Aircraft position
- F-PLN display on ND and automatic WPT sequencing
- Bearing from A/C PPOS to TO WPT and related distance
- True track, time estimate and distance between WPTs
- Total time and distance to destination
- Limited DIRECT TO function
- AP/FD selected modes.
Notes:
- For navigation purposes, it is recommended to use TRK/FPA
- At least one FG must be available to engage AP and A/THR
- On each MCDU, time estimates are computed using the current GS from the onside IRS.
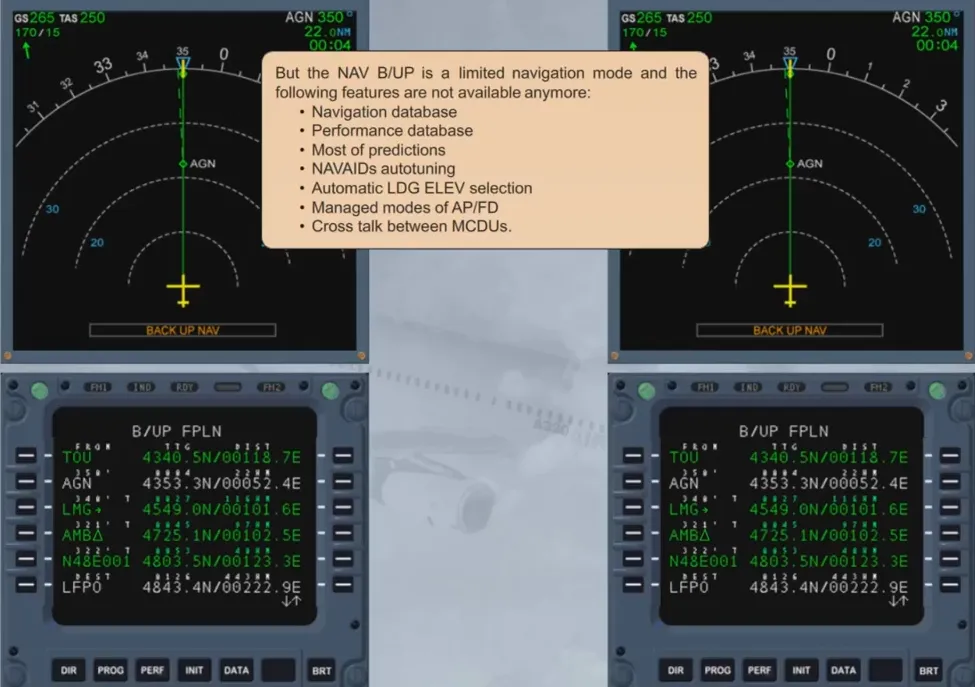
But the NAV B/UP is a limited navigation mode and the following features are not available anymore:
- Navigation database
- Performance database
- Most of predictions
- NAVAIDs autotuning
- Automatic LDG ELEV selection
- Managed modes of AP/FD
- Cross talk between MCDUs.
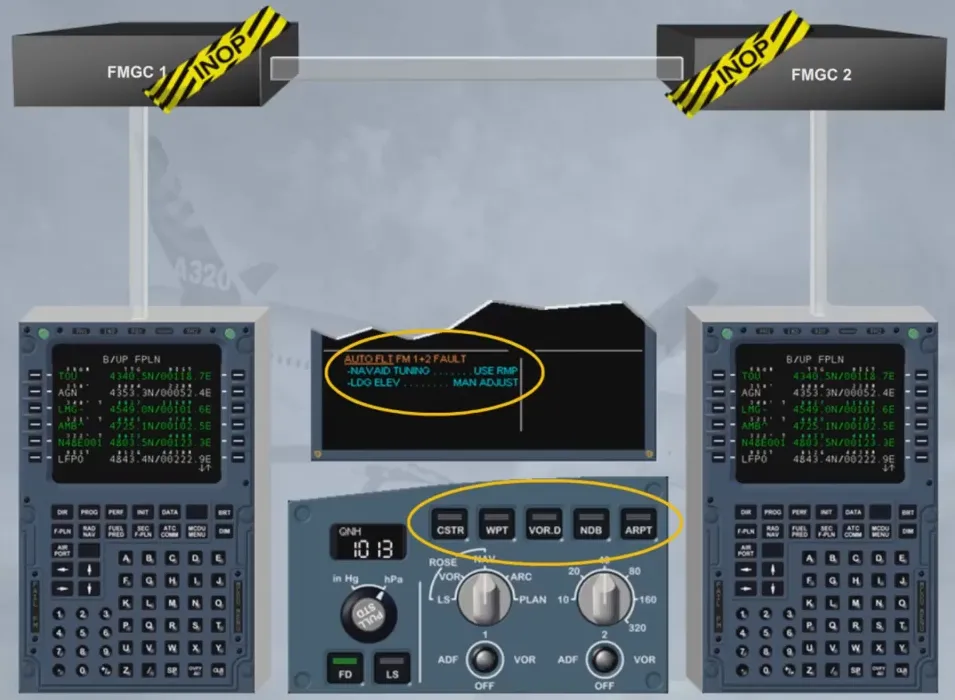
As the FMs are lost, the autotuning of the NAVAIDs is also lost. This is why the NAVAIDs must be manually tuned using the RMPs. As the databases are lost, the landing elevation has to be manually adjusted and the optional data display pbs of the EFIS CTL panels are now inoperative.
Moreover, as we have seen previously, the cross talk is also lost. This means that each and every F-PLN modifications have to be done on both MCDUs.
When activated, the NAV B/UP can be deactivated:
- By selecting the DESELECT NAV B/UP prompt on the MCDUs, or
- Automatically, if an FM source change occurs, or
- By selecting an FM sub-system on the MCDU MENU page.
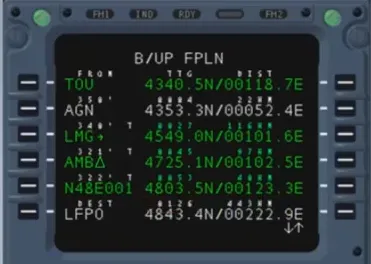
Let’s have a closer look at the available MCDU pages. We will start with the Back-Up Flight Plan (B/UP FPLN).
This page is accessed by pushing the F-PLN key, once the NAV B/UP is activated. There, we can find, for each WPT of the F-PLN and displayed on lines 1 to 5:
- The WPT’s ident and its coordinates
- The true track and the DISTance (DIST) between two consecutive WPTs
- The Time To Go (TTG): The time between the A/C and the given WPT.
Note: The information given for the TO WPT is between the A/C and the TO WPT, not between the FROM and TO WPTs. Moreover, the B/UP F-PLN page shows the bearing between the A/C and the TO WPT.

On line 6, we have data related to the destination airport:
- The airport’s ident and its coordinates
- The DIST to destination:
- The direct distance from the aircraft to the TO WPT plus the along F-PLN distances down to the destination airport
- The TTG: DIST to destination divided by GS.
There are no LAT or VERT REV pages on NAV B/UP. Each revision is made on B/UP FPLN itself.
Remember that the NAV database is lost. This means that no Place Bearing fixes (PB WPTs) nor Place Bearing Distance fixes (PBD WPTs) can be inserted in the F-PLN. In fact, a WPT can only be inserted by writing its coordinates. The ident of the WPT is then automatically generated using the above-mentioned coordinates.

The B/UP FPLN for DIRect-TO functions is called by pushing the DIR key while NAV B/UP is active and the A/C position is valid.
It allows the selection or the insertion of the desired WPT.
The information given for each WPT is the same as the one found on B/UP FPLN.
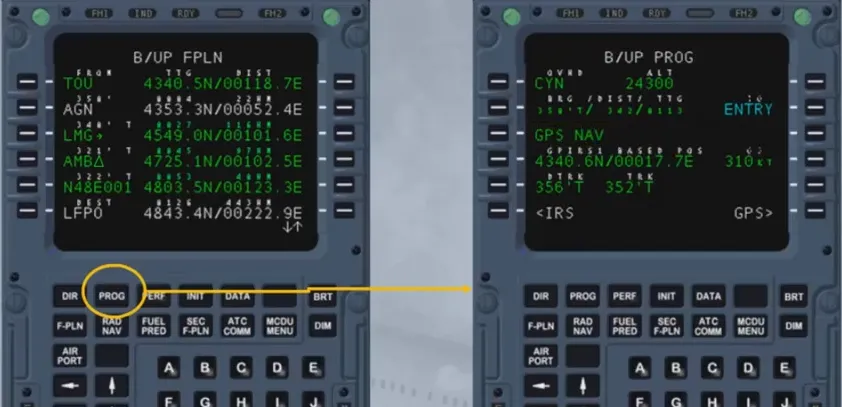
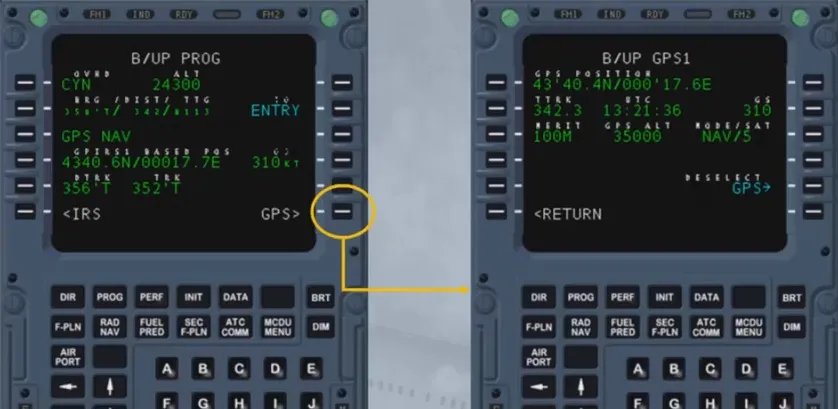
The Back-Up Progress page (B/UP PROG) is accessed by pushing the PROG key, once the NAV B/UP is activated. This page displays:
- On line 1: The ident of the last sequenced WPT and the altitude at which the sequencing was done
- On line 2: The BRG, DIST and TTG to a WPT entered by the crew
- On line 3: The navigation mean used by the MCDU:
- GPS NAV (Default, if a GPS is installed)
- IRS ONLY NAV (GPS installed, but data not available)
- Nothing if a GPS is not installed …
- On line 4: The current A/C position based on the navigation mean in use and the GS from the selected IRS
- On line 5: The desired track from the B/UP FPLN active leg and the actual track from the selected IRS
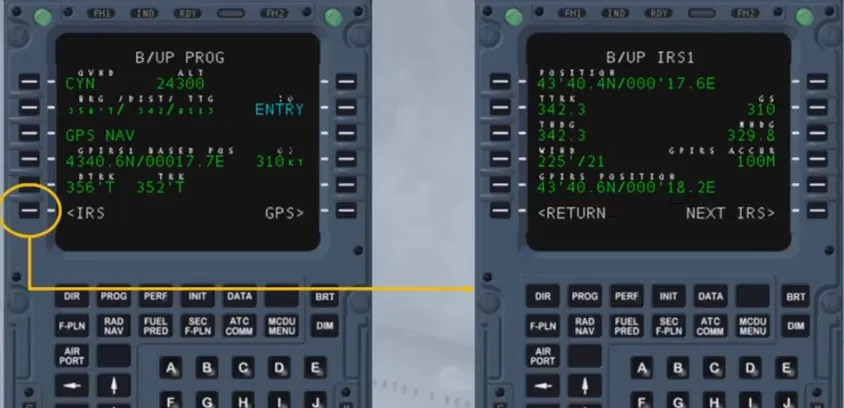
- On line 6: The access to the onside Back-Up IRS page (B/UP IRS) and to the Back-Up GPS page (B/UP GPS). The GPS prompt does not show if a GPS is not installed.
Here is an example of a B/UP IRS. This page displays, from line 1 to 5, the current A/C position, true track, GS, true heading, magnetic heading, wind true direction and velocity, GPIRS accuracy and GPIRS current position.
Notice that the GPIRS fields will be dashed if the GPS information is not available and blanked if a GPS is not fitted.
Line 6 allows to go back to B/UP PROG or to toggle between the on-side B/UP IRS and B/UP IRS3 (MCDU1 gives access to B/UP IRS1 and B/UP IRS3 whereas MCDU2 gives access to B/UP IRS2 and B/UP IRS3).
Here is an example of a B/UP GPS. This page displays:
- From line 1 to 3, the current GPS position, true track, UTC, GS, figure of merit, altitude, mode of operation and number of currently tracked satellites
- Line 5 allows the de-selection of the GPS for the NAV B/UP but not for the regular FM navigation
- Line 6 allows to go back to B/UP PROG.
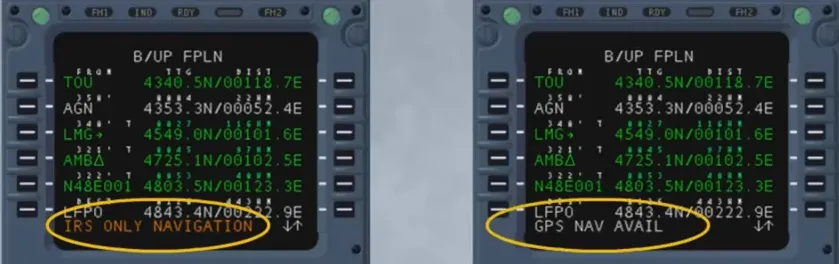
Two new scratchpad messages can appear on the MCDUs while using the NAV B/UP mode:
- IRS ONLY NAVIGATION: It indicates that the GPS is lost (not displayed in case of a manual de-selection of the GPS )
- GPS NAV AVAIL: It indicates that the GPS is recovered (not displayed in case of a manual selection of the GPS).
Module completed
Video study
Section titled “Video study”- Watch the video available on YouTube